Menu Close

Month: October 2012

scp command line to securely copy files over ssh, between Linux, Mac or Windows

by garron.me

SCP Introduction

scp stands for secure cp (copy), which means you can copy files across ssh connection. That connection will be securely encrypted, it is a very secure way to copy files between computers

You can use scp to copy files from or to a remote server. You can also copy files from one remote server to another remote server, without passing traffic through your PC.

You can use scp on Linux, Mac and Windows (using WinSCP).

Hide Apache version from hackers

A first line of defense in web application world is to hide as much info as possible from HTTP headers!

In this article we will see how easy it is to hide apache’s version number.

1. Keep a backup of file /etc/apache2/apache2.conf.

2. Open /etc/apache2/apache2.conf file for edit. For ubuntu users issue the following command:

sudo nano /etc/apache2/apache2.conf

Hosting multiple websites with Apache2

by debian-administration.org

One of the most common Apache2 questions I’ve seen on Debian mailing lists is from users who wonder how to host multiple websites with a single server. This is very straightforward, especially with the additional tools the Debian package provides.

We’ve previously discussed some of the tools which are included in the Apache2 package, but what we didn’t do was show they’re used from start to finish.

There are many different ways you can configure Apache to host multiple sites, ranging from the simple to the complex. Here we’re only going to cover the basics with the use of the NameVirtualHost directive. The advantage of this approach is that you don’t need to hard-wire any IP addresses, and it will just worktm. The only thing you need is for your domain names to resolve to the IP address of your webserver.


Servername in Apache2

Towards the end of the install you will see this warning:

apache2: Could not reliably determine the server's fully qualified domain name,
using 127.0.0.1 for ServerName

Although I’ll be going into some detail about the options and settings available in the main apache configuration file, let’s fix that warning straight away.

Open the main apache config:

sudo nano /etc/apache2/apache2.conf

At the bottom of the file add the following:

ServerName demo

Change the ServerName to your Slice hostname or a FQDN (remember this demo Slice has a hostname of ‘demo’).

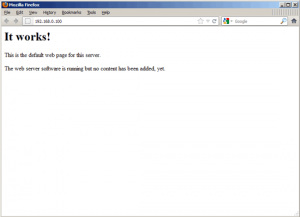
Once done, save apache2.conf and gracefully restart Apache (this method of restarting won’t kill open connections):

sudo apache2ctl graceful

Now the warning has gone. Nice.

How to change the root password in Ubuntu

As default Ubuntu has no password set for the root user.

To gain root access you have to type in your own user password.

This is the password you set for the first user while installing Ubuntu.


To manually set a password for the root user, type in the following in the shell:

sudo passwd 

After that you are asked to type in the new root password twice.


Finally, your root user has its own password.

Setting up SSL: Ubuntu and Apache 2


Important Note!This steps were verified with Ubuntu 10.04 LTS, but this will be my last Ubuntu SSL how-to. I’ve switched to Debian — Ubuntu’s Unity interface is just plain silly on the desktop. So please refer to my Debian document in the future.This document requires that you’ve got a signed server.crt and a server.key file available. You may have just gone through my page Creating Certificate Authorities and self-signed SSL certificates. If not, go there first and follow the instructions.

The remaining steps involve Apache and other tweaks detailed step-by-step below. This file was originally written for Ubuntu 6.06, but has been kept current and verified with 10.04 Lucid Lynx. It should work with most/all releases in between — and probably Debian-based distros in general, with little or no modification.

Installing Apache2 With PHP5 And MySQL Support On Ubuntu 12.04 LTS (LAMP)

by howtoforge.com

LAMP is short for Linux, Apache, MySQL, PHP. This tutorial shows how you can install an Apache2 webserver on an Ubuntu 12.04 LTS server with PHP5 support (mod_php) and MySQL support.

I do not issue any guarantee that this will work for you!


1 Preliminary Note

In this tutorial I use the hostname server1.example.com with the IP address 192.168.0.100. These settings might differ for you, so you have to replace them where appropriate.

I’m running all the steps in this tutorial with root privileges, so make sure you’re logged in as root: 

sudo su