Menu Close

Category: Web Development

How to Stop WordPress Asking for FTP details to Upgrade Plugins

By gravitationalfx.com

WordPress makes the experience of keeping plugins and the core installation an easy job and that goes a long way to making it one of the most popular Content Management Systems.

From the Admin Dashboard you can see how many updates there are and are given links to upgrade automatically.

WordPress 3.x even introduced the ability to upgrade everything all at the same time.

For most installations, this is all a seamless single-click operation.

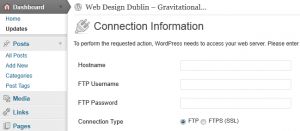
So, why do some people get an additional form pop up asking for their ftp account details?

And more importantly, how do you make it go away – forever!

Here’s an explanation of why WordPress asks for this information and what you can do minimise or even stop typing your details in each time you perform an upgrade.

Or you can just jump to the quick fix and see if it works for you. Who cares how, right?

PHP Session Locks – How to Prevent Blocking Requests

by konrness.com

php[1]Many people are aware that modern browsers limit the number of concurrent connections to a specific domain to between 4 or 6. This means that if your web page loads dozens of asset files (js, images, css) from the same domain they will be queued up to not exceed this limit. This same problem can happen, but even worse, when your page needs to make several requests to PHP scripts that use sessions.

Problem

PHP writes its session data to a file by default. When a request is made to a PHP script that starts the session (session_start()), this session file is locked. What this means is that if your web page makes numerous requests to PHP scripts, for instance, for loading content via Ajax, each request could be locking the session and preventing the other requests from completing.

The other requests will hang on session_start() until the session file is unlocked. This is especially bad if one of your Ajax requests is relatively long-running.

When to use $_SESSION vs $_COOKIE

by buildinternet.com

A critical feature in web programming is the ability to seamlessly pass data from one page load to the next. It’s used most commonly when dealing with user logins, but also for passing error messages, shopping carts, etc.

Storing data across pages using PHP is done with two variables in the global scope, called $_SESSION and $_COOKIE, and although accomplishing the same end goal, the both go about it in very different ways. The purpose of this article is to give a brief look into the differences between cookies and sessions, when it’s better to use one versus the other, and the pros and cons of the two.

The difference is in how each store data. Cookies store data locally in the user’s browser, while sessions store data on the webserver.


5 JQuery Infinite Scrolling Demos

by JQuery4you.com

Here are 5 demos which you could use as the barebones for your next infinite scrolling project. I’ve been playing around with infinite scrolling for one of my projects and I’ve tried a few jQuery plugins which can manage the “endless scroll” showing items, posts, rss feeds, tweets or anything really. The content can be generated dynamically from JavaScript but most commonly loaded from a server script using AJAX. Also I found that Firefox 8 only detects the scroll upto 99.85% of the screen which was strange.

Infinite Scrolling Demo 1

This demo uses the jQuery Masonry plugin together with the Infinite Scroll plugin. The Masonry plugin really is good for obtaining fluid layouts definately recommend it for that. The infinite scroll plugin by Paul Irish is good at loading pages which already exist such as page.html, page2.html, page3.html but it can’t handle dynamic generated content such as hitting the same page.php file with appended parameters page.php?data=xxx. Just bear that in mind if you go with this option.

infinitescroll1


Convert a UNIX timestamp to a datetime with MySQL

by electrictoolbox.com

Dates and times can be stored as an integer value as a UNIX timestamp. This isn’t a particularly human readable format but can be converted in MySQL to a datetime value using the FROM_UNIXTIME function.

Dates and times as timestamps

Back when I first started using MySQL and PHP and created an ecommerce system that was used on a number of websites, I decided to store datetimes as a UNIX timestamp for whatever reason. This made it easy to use the PHP date function to format the dates but is not so useful when browsing data in the database or selecting date ranges in a query. I no longer do this and always store date times as a datetime field type now.

Converting integer timestamp to a datetime

In my old ecommerce system there was a table called “orders” with a column called “date_ordered” which was a UNIX timestamp stored as an integer. To convert this to a datetime as part of the SELECT query this needs to be done:


SELECT other fields here, FROM_UNIXTIME(date_ordered)
FROM orders
WHERE ...


The integer field will now be represented in the resultset as a datetime string in the format YYYY-MM-DD HH:MM:SS.

Hide Apache version from hackers

A first line of defense in web application world is to hide as much info as possible from HTTP headers!

In this article we will see how easy it is to hide apache’s version number.

1. Keep a backup of file /etc/apache2/apache2.conf.

2. Open /etc/apache2/apache2.conf file for edit. For ubuntu users issue the following command:

sudo nano /etc/apache2/apache2.conf

Hosting multiple websites with Apache2

by debian-administration.org

One of the most common Apache2 questions I’ve seen on Debian mailing lists is from users who wonder how to host multiple websites with a single server. This is very straightforward, especially with the additional tools the Debian package provides.

We’ve previously discussed some of the tools which are included in the Apache2 package, but what we didn’t do was show they’re used from start to finish.

There are many different ways you can configure Apache to host multiple sites, ranging from the simple to the complex. Here we’re only going to cover the basics with the use of the NameVirtualHost directive. The advantage of this approach is that you don’t need to hard-wire any IP addresses, and it will just worktm. The only thing you need is for your domain names to resolve to the IP address of your webserver.


Servername in Apache2

Towards the end of the install you will see this warning:

apache2: Could not reliably determine the server's fully qualified domain name,
using 127.0.0.1 for ServerName

Although I’ll be going into some detail about the options and settings available in the main apache configuration file, let’s fix that warning straight away.

Open the main apache config:

sudo nano /etc/apache2/apache2.conf

At the bottom of the file add the following:

ServerName demo

Change the ServerName to your Slice hostname or a FQDN (remember this demo Slice has a hostname of ‘demo’).

Once done, save apache2.conf and gracefully restart Apache (this method of restarting won’t kill open connections):

sudo apache2ctl graceful

Now the warning has gone. Nice.

Setting up SSL: Ubuntu and Apache 2


Important Note!This steps were verified with Ubuntu 10.04 LTS, but this will be my last Ubuntu SSL how-to. I’ve switched to Debian — Ubuntu’s Unity interface is just plain silly on the desktop. So please refer to my Debian document in the future.This document requires that you’ve got a signed server.crt and a server.key file available. You may have just gone through my page Creating Certificate Authorities and self-signed SSL certificates. If not, go there first and follow the instructions.

The remaining steps involve Apache and other tweaks detailed step-by-step below. This file was originally written for Ubuntu 6.06, but has been kept current and verified with 10.04 Lucid Lynx. It should work with most/all releases in between — and probably Debian-based distros in general, with little or no modification.

Installing Apache2 With PHP5 And MySQL Support On Ubuntu 12.04 LTS (LAMP)

by howtoforge.com

LAMP is short for Linux, Apache, MySQL, PHP. This tutorial shows how you can install an Apache2 webserver on an Ubuntu 12.04 LTS server with PHP5 support (mod_php) and MySQL support.

I do not issue any guarantee that this will work for you!


1 Preliminary Note

In this tutorial I use the hostname server1.example.com with the IP address 192.168.0.100. These settings might differ for you, so you have to replace them where appropriate.

I’m running all the steps in this tutorial with root privileges, so make sure you’re logged in as root: 

sudo su