Based on Android 4.2
Version 11.3
Copyright © 2009, 2010, 2011, 2012, 2013 Lars Vogel
The ActionBar is located at the top of the activity. It can display the activity title, icon, actions which can be triggered, additional views Views other interactive items. It can also be used for navigation in your application.
Older Android devices have a hardware Option button which would open a menu at the bottom of the application once pressed, i.e. the OptionsMenu. The ActionBar is superior to the OptionsMenu, in that it is clearly visible, while theOptionsMenu is only shown on request and the user may not recognize that options are available.
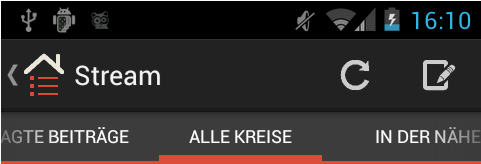
The following picture shows the ActionBar of a The Google+ Android application with interactive items and a navigation bar.
An activity populates the ActionBar in its onCreateOptionsMenu() method. We call these entries actions.
The actions for the ActionBar are typically defined in an XML resource file. The MenuInflator class allows to inflate actions defined in an XML file and add them to the ActionBar.
The showAsAction attribute allows you to define how the action is displayed. For example the ifRoom attribute defines that the action is on y displayed in the ActionBar if there is sufficient space available.
<menu xmlns:android="http://schemas.android.com/apk/res/android" >

    <item
        android:id="@+id/action_refresh"
        android:orderInCategory="100"
        android:showAsAction="always"
        android:icon="@drawable/ic_action_search"
        android:title="Refresh"/>
    <item
        android:id="@+id/action_settings"
        android:title="Settings">
    </item>

</menu>
An instance of type MenuInflator can get accessed via the getMenuInflator() method in your activity. The following example code demonstrates the creation of actions for the ActionBar.
@Override
  public boolean onCreateOptionsMenu(Menu menu) {
    MenuInflater inflater = getMenuInflater();
    inflater.inflate(R.menu.mainmenu, menu);
    return true;
  }
To search for a menu item in a menu you can use the findItem() method of the Menu class. This method allows to search by id.
If an actions in the ActionBar is selected, the onOptionsItemSelected() method is called. It receives the selected action as parameter. Based on this information you code can decide what to do.
@Override
  public boolean onOptionsItemSelected(MenuItem item) {
    switch (item.getItemId()) {
    case R.id.menuitem1:
      Toast.makeText(this, "Menu Item 1 selected", Toast.LENGTH_SHORT)
          .show();
      break;
    case R.id.menuitem2:
      Toast.makeText(this, "Menu item 2 selected", Toast.LENGTH_SHORT)
          .show();
      break;

    default:
      break;
    }

    return true;
  }
You can change the visibility of the ActionBar at runtime. The following code demonstrates that.
ActionBar actionBar = getActionBar();
actionBar.hide();
// More stuff here...
actionBar.show();
You can also change the text which is displayed alongside the application icon at runtime. The following example shows that.
ActionBar actionBar = getActionBar();
actionBar.setSubtitle("mytest");
actionBar.setTitle("vogella.com");
You also add a drawable to the ActionBar background via the ActionBar.setBackgroundDrawable() method.
The ActionBar scales the image therefore it is best practice to provide a scalable drawable, e.g. an 9-patch or XMLdrawable. As of Android 4.2 the drawable for the ActionBar can also be an animated.
You can also hide the software navigation button in your Android application to have more space available. If the user touches the button of the screen the navigation button are automatically shown again.
You can dim the navigation buttons in an activity with the following code.
getWindow().
  getDecorView().
  setSystemUiVisibility(View.SYSTEM_UI_FLAG_HIDE_NAVIGATION);
The following screenshots show an application with and without the navigation buttons.
The action bar shows an icon of your application, this is called the home icon. You can add an action to this icon. If you select this icon the onOptionsItemSelected() method will be called with the value android.R.id.home. The recommendation is to return to the main activity in your program.
// If home icon is clicked return to main Activity
case android.R.id.home:
  Intent intent = new Intent(this, OverviewActivity.class);
  intent.addFlags(Intent.FLAG_ACTIVITY_CLEAR_TOP);
  startActivity(intent);
  break;
As of Android 4.1 this code is not required anymore, you can simply set the parentActivityName in theAndroidManifest.xml file, pointing to the parent activity.
<activity
  android:name="com.vogella.android.actionbar.customviews.SecondActivity"
  android:label="@string/app_name"
  android:parentActivityName="MainActivity">
</activity>
The home icon can also be used for an “up” navigation in your application. In practise this is not frequently used by Android applications and should therefore be avoided.
You can define that the action bar should be automatically split by the system if not enough space is available.
You can activate that via the android:uiOptions="SplitActionBarWhenNarrow" parameter in the declaration of your application or activity in the AndroidManifest.xml file.
You can also add a custom View to the ActionBar. For this you use the setCustomView method for the ActionViewclass. You also have to enable the display of custom views via the setDisplayOptions() method by passing in theActionBar.DISPLAY_SHOW_CUSTOM flag.
For example you can define a layout file which contains a EditText element.
<?xml version="1.0" encoding="utf-8"?>
<EditText xmlns:android="http://schemas.android.com/apk/res/android"
    android:id="@+id/searchfield"
    android:layout_width="match_parent"
    android:layout_height="match_parent"
    android:inputType="textFilter" >

</EditText>
This layout can be assigned to the ActionBar via the following code. The example code allow attaches a listener to the custom view.
package com.vogella.android.actionbar.customviews;

import android.app.ActionBar;
import android.app.Activity;
import android.os.Bundle;
import android.view.KeyEvent;
import android.widget.EditText;
import android.widget.TextView;
import android.widget.TextView.OnEditorActionListener;
import android.widget.Toast;

public class MainActivity extends Activity {

  @Override
  protected void onCreate(Bundle savedInstanceState) {
    super.onCreate(savedInstanceState);
    setContentView(R.layout.activity_main);

    ActionBar actionBar = getActionBar();
    // add the custom view to the action bar
    actionBar.setCustomView(R.layout.actionbar_view);
    EditText search = (EditText) actionBar.getCustomView().findViewById(R.id.searchfield);
    search.setOnEditorActionListener(new OnEditorActionListener() {

      @Override
      public boolean onEditorAction(TextView v, int actionId,
          KeyEvent event) {
        Toast.makeText(MainActivity.this, "Search triggered",
            Toast.LENGTH_LONG).show();
        return false;
      }
    });
    actionBar.setDisplayOptions(ActionBar.DISPLAY_SHOW_CUSTOM
        | ActionBar.DISPLAY_SHOW_HOME);
  }

}
A contextual action mode activates a temporary ActionBar that overlays the application ActionBar for the duration of a particular sub-task.
The contextual action mode is typically activated by selecting an item or by long clicking on it.
To implemented this, call the startActionMode() method on a View or on your activity. This method gets anActionMode.Callback object which is responsible for the lifecycle of the contextual ActionBar.
You could also assign a context menu to a View via the registerForContextMenu(view) method. A context menu is also activated if the user “long presses” the view. The onCreateContextMenu() method is called every time a context menu is activated as the context menu is discarded after its usage. You should prefer the contextual action mode over the usage of context menus.
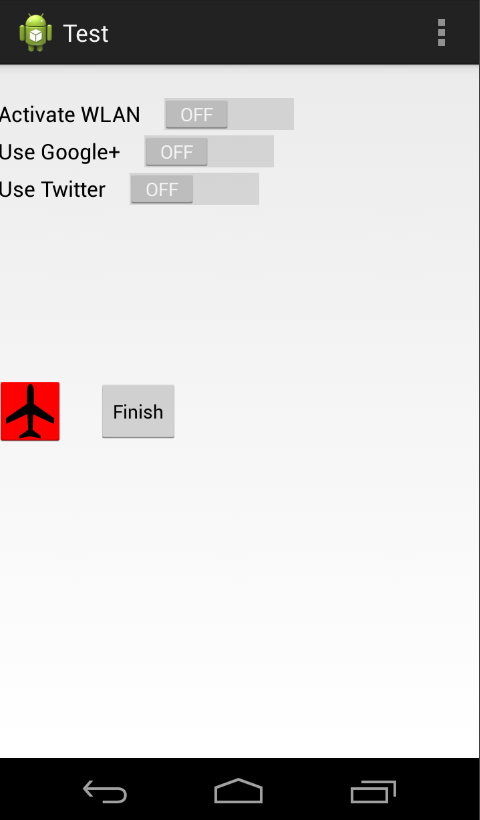
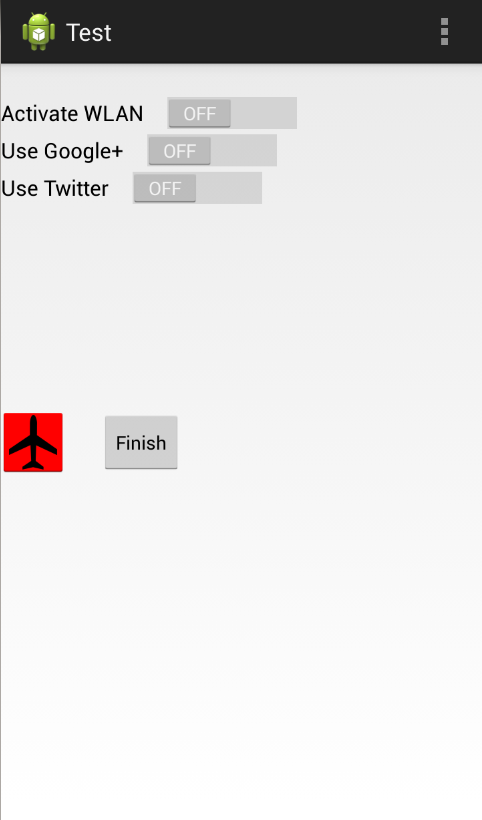
An action view is a widget that appears in the action bar as a substitute for an action item’s button. You can for example use this feature to replace an action item with a ProgressBar view. An action view for an action can be defined via theandroid:actionLayout or android:actionViewClass attribute to specify either a layout resource or widget class to use.
This replacement is depicted in the following screenshots.

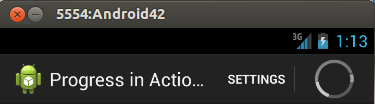
The following activity replace the icon at runtime with an action view which contains a ProgressBar view.
package com.vogella.android.actionbar.progress;

import android.app.ActionBar;
import android.app.Activity;
import android.os.AsyncTask;
import android.os.Bundle;
import android.view.Menu;
import android.view.MenuItem;

public class MainActivity extends Activity {

  private MenuItem menuItem;

  @Override
  protected void onCreate(Bundle savedInstanceState) {
    super.onCreate(savedInstanceState);
    setContentView(R.layout.activity_main);
    ActionBar actionBar = getActionBar();
    actionBar.setDisplayOptions(ActionBar.DISPLAY_SHOW_HOME
        | ActionBar.DISPLAY_SHOW_TITLE | ActionBar.DISPLAY_SHOW_CUSTOM);
  }

  @Override
  public boolean onCreateOptionsMenu(Menu menu) {
    getMenuInflater().inflate(R.menu.main, menu);
    return true;
  }

  @Override
  public boolean onOptionsItemSelected(MenuItem item) {
    switch (item.getItemId()) {
    case R.id.menu_load:
      menuItem = item;
      menuItem.setActionView(R.layout.progressbar);
      menuItem.expandActionView();
      TestTask task = new TestTask();
      task.execute("test");
      break;
    default:
      break;
    }
    return true;
  }

  private class TestTask extends AsyncTask<String, Void, String> {

    @Override
    protected String doInBackground(String... params) {
      // Simulate something long running
      try {
        Thread.sleep(2000);
      } catch (InterruptedException e) {
        e.printStackTrace();
      }
      return null;
    }

    @Override
    protected void onPostExecute(String result) {
      menuItem.collapseActionView();
      menuItem.setActionView(null);
    }
  };
}
The following code shows the layout used for the action view.
<?xml version="1.0" encoding="utf-8"?>
<ProgressBar xmlns:android="http://schemas.android.com/apk/res/android"
        android:id="@+id/progressBar2"
        android:layout_width="wrap_content"
     android:layout_height="wrap_content">

</ProgressBar>
The following code shows the XML files for the menu.
<menu xmlns:android="http://schemas.android.com/apk/res/android" >

    <item
        android:id="@+id/menu_settings"
        android:orderInCategory="100"
        android:showAsAction="always"
        android:title="Settings"
        />

    <item
        android:id="@+id/menu_load"
        android:icon="@drawable/navigation_refresh"
        android:orderInCategory="200"
        android:showAsAction="always"
        android:title="Load"/>

</menu>
An ActionProvider defines rich menu interaction in a single component. It can generate action views for use in the action bar, dynamically populate submenus of a action item, and handle default action item invocations.
Currently the Android platform provides two ActionProvider the MediaRouteActionProvider and theShareActionProvider.
The following uses the ShareActionProvider to demonstrate the usage of ActionProviders.
This ActionProvider allows you to use share selected content using application which have registered theIntent.ACTION_SEND intent.
To use ShareActionProvider you have to define a special menu entry for it and assign an intent which contain the sharing data to it.
<?xml version="1.0" encoding="utf-8"?>
<menu xmlns:android="http://schemas.android.com/apk/res/android" >

   <item android:id="@+id/menu_share"
          android:title="Share"
          android:showAsAction="ifRoom"
          android:actionProviderClass="android.widget.ShareActionProvider" />
    <item
        android:id="@+id/item1"
        android:showAsAction="ifRoom"
        android:title="More entries...">
    </item>

</menu>
@Override
  public boolean onCreateOptionsMenu(Menu menu) {
    getMenuInflater().inflate(R.menu.activity_main, menu);

    // Get the ActionProvider
    provider = (ShareActionProvider) menu.findItem(R.id.menu_share)
        .getActionProvider();
    // Initialize the share intent
    Intent intent = new Intent(Intent.ACTION_SEND);
    intent.setType("text/plain");
    provider.setShareIntent(intent);
    return true;
  }

  @Override
  public boolean onOptionsItemSelected(MenuItem item) {
    switch (item.getItemId()) {
    case R.id.menu_share:
      doShare();
      break;
    default:
      break;
    }
    return true;
  }

  public void doShare() {
    // Populare the share intent with data
    Intent intent = new Intent(Intent.ACTION_SEND);
    intent.setType("text/plain");
    intent.putExtra(Intent.EXTRA_TEXT, "This is a message for you");
    provider.setShareIntent(intent);
  }
Fragments can also be used in combination with the ActionBar for navigation. For this your main activity needs to implement a TabListener which is responsible for moving between the tabs.
The ActionBar allows to add tabs to it via the newTab() method.
The following code shows such an activity. It uses dummy activities to demonstrate the switch.
package com.vogella.android.actionbar.tabs;

import android.app.ActionBar;
import android.app.Fragment;
import android.app.FragmentTransaction;
import android.os.Bundle;
import android.support.v4.app.FragmentActivity;
import android.view.Gravity;
import android.view.LayoutInflater;
import android.view.Menu;
import android.view.View;
import android.view.ViewGroup;
import android.widget.TextView;

public class MainActivity extends FragmentActivity implements
ActionBar.TabListener { private static final String STATE_SELECTED_NAVIGATION_ITEM = "selected_navigation_item";
@Override
protected void onCreate(Bundle savedInstanceState) {
super.onCreate(savedInstanceState);
setContentView(R.layout.activity_main);
// Set up the action bar to show tabs.
final ActionBar actionBar = getActionBar();
actionBar.setNavigationMode(ActionBar.NAVIGATION_MODE_TABS);
// For each of the sections in the app, add a tab to the action bar.
actionBar.addTab(actionBar.newTab().setText(R.string.title_section1)
.setTabListener(this));
actionBar.addTab(actionBar.newTab().setText(R.string.title_section2)
.setTabListener(this));
actionBar.addTab(actionBar.newTab().setText(R.string.title_section3)
.setTabListener(this));
}
@Override
public void onRestoreInstanceState(Bundle savedInstanceState) {
// Restore the previously serialized current tab position.
if (savedInstanceState.containsKey(STATE_SELECTED_NAVIGATION_ITEM)) {
getActionBar().setSelectedNavigationItem(savedInstanceState.getInt(STATE_SELECTED_NAVIGATION_ITEM));
}
}
@Override
public void onSaveInstanceState(Bundle outState) {
// Serialize the current tab position.
outState.putInt(STATE_SELECTED_NAVIGATION_ITEM, getActionBar()
.getSelectedNavigationIndex());
}
@Override
public boolean onCreateOptionsMenu(Menu menu) {
getMenuInflater().inflate(R.menu.activity_main, menu);
return true;
}
@Override
public void onTabSelected(ActionBar.Tab tab,
FragmentTransaction fragmentTransaction) {
// When the given tab is selected, show the tab contents in the
// container view.
Fragment fragment = new DummySectionFragment();
Bundle args = new Bundle();
args.putInt(DummySectionFragment.ARG_SECTION_NUMBER,
tab.getPosition() + 1);
fragment.setArguments(args);
getFragmentManager().beginTransaction()
.replace(R.id.container, fragment).commit();
}
@Override
public void onTabUnselected(ActionBar.Tab tab,
FragmentTransaction fragmentTransaction) {
}
@Override
public void onTabReselected(ActionBar.Tab tab,
FragmentTransaction fragmentTransaction) {
} public static class DummySectionFragment extends Fragment {
public static final String ARG_SECTION_NUMBER = "placeholder_text";
@Override
public View onCreateView(LayoutInflater inflater, ViewGroup container,
Bundle savedInstanceState) {
TextView textView = new TextView(getActivity());
textView.setGravity(Gravity.CENTER);
textView.setText(Integer.toString(getArguments().getInt(ARG_SECTION_NUMBER)));
return textView;
}
}
}
You can also use a spinner in the action bar for navigation. The following code demonstrates that.
package com.vogella.android.actionbar.spinner;

import android.app.ActionBar;
import android.app.Fragment;
import android.os.Bundle;
import android.support.v4.app.FragmentActivity;
import android.view.Gravity;
import android.view.LayoutInflater;
import android.view.Menu;
import android.view.View;
import android.view.ViewGroup;
import android.widget.ArrayAdapter;
import android.widget.TextView;

public class MainActivity extends FragmentActivity implements
ActionBar.OnNavigationListener { private static final String STATE_SELECTED_NAVIGATION_ITEM = "selected_navigation_item";
@Override
protected void onCreate(Bundle savedInstanceState) {
super.onCreate(savedInstanceState);
setContentView(R.layout.activity_main);
// Set up the action bar to show a dropdown list.
final ActionBar actionBar = getActionBar();
actionBar.setDisplayShowTitleEnabled(false);
actionBar.setNavigationMode(ActionBar.NAVIGATION_MODE_LIST);
final String[] dropdownValues = getResources().getStringArray(R.array.dropdown);
// Specify a SpinnerAdapter to populate the dropdown list.
ArrayAdapter<String> adapter = new ArrayAdapter<String>(actionBar.getThemedContext(),
android.R.layout.simple_spinner_item, android.R.id.text1,
dropdownValues);
adapter.setDropDownViewResource(android.R.layout.simple_spinner_dropdown_item);
// Set up the dropdown list navigation in the action bar.
actionBar.setListNavigationCallbacks(adapter, this);
// Use getActionBar().getThemedContext() to ensure
// that the text color is always appropriate for the action bar
// background rather than the activity background.
}
@Override
public void onRestoreInstanceState(Bundle savedInstanceState) {
// Restore the previously serialized current dropdown position.
if (savedInstanceState.containsKey(STATE_SELECTED_NAVIGATION_ITEM)) {
getActionBar().setSelectedNavigationItem(savedInstanceState.getInt(STATE_SELECTED_NAVIGATION_ITEM));
}
}
@Override
public void onSaveInstanceState(Bundle outState) {
// Serialize the current dropdown position.
outState.putInt(STATE_SELECTED_NAVIGATION_ITEM, getActionBar()
.getSelectedNavigationIndex());
}
@Override
public boolean onCreateOptionsMenu(Menu menu) {
getMenuInflater().inflate(R.menu.activity_main, menu);
return true;
}
@Override
public boolean onNavigationItemSelected(int position, long id) {
// When the given dropdown item is selected, show its contents in the
// container view.
Fragment fragment = new DummySectionFragment();
Bundle args = new Bundle();
args.putInt(DummySectionFragment.ARG_SECTION_NUMBER, position + 1);
fragment.setArguments(args);
getFragmentManager().beginTransaction()
.replace(R.id.container, fragment).commit();
return true;
} public static class DummySectionFragment extends Fragment {
public static final String ARG_SECTION_NUMBER = "placeholder_text";
@Override
public View onCreateView(LayoutInflater inflater, ViewGroup container,
Bundle savedInstanceState) {
TextView textView = new TextView(getActivity());
textView.setGravity(Gravity.CENTER);
textView.setText(Integer.toString(getArguments().getInt(ARG_SECTION_NUMBER)));
return textView;
}
}
}
This chapter will demonstrate how to create items in the ActionBar and react to the selection of the user.
It is based on the same project as the Fragment tutorial which can be found under Android Fragments tutorial . If you have already create this project you can continue to reuse it, if not the following describes the required setup to continue with this tutorial.
Use File ? New ? Other ? Android Icon Set to create a refresh icon for your ActionBar. The wizard allows you to select which type of icons you want to create. Specify the name ic_refresh for the new icon and select a corresponding entry from the Clipart.
Note
The Android design page also provides prepared icons for the ActionBar. You find the downloads on the following webpage.
http://developer.android.com/design/downloads/index.html
Continue to use the com.example.android.rssfeed project.
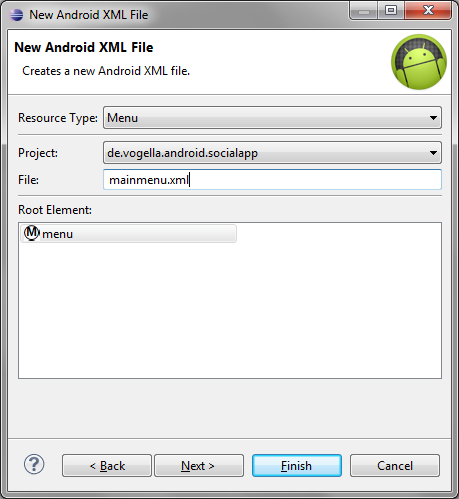
Create a new Menu XML resource called mainmenu.xml. To create this XML file select your project, right click on it and select New ? Other… ? Android ? Android XML File.
Select the Menu option, enter mainmenu.xml as the filename and press the Finish button.
Open the mainmenu.xml file and select the Layout tab of the Android editor.
This will create a new menu file in the res/menu folder of your project. Open this file and select the Layout tab of the Android editor. Via the Add button you can add new entries.
Press the Add button and select the Item entry. Enter an entry similar to the following screenshot.
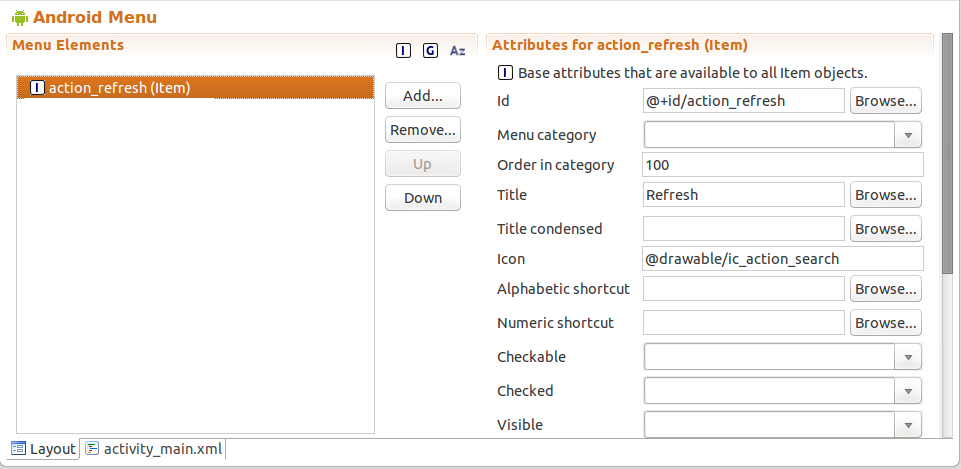
Add a second action to your menu. Use Refresh as the title attribute and menuitem_refresh as the ID attribute.
Assign a fitting icon to it for example an icon which you downloaded earlier in this exercise. Copy the icon you want to use into /res/drawable-mdpi folder. Make sure that the filename does not has any special character and that you only copy the icon which you want to use, not all of them.
Add a second entry to the menu with the ID attribute set to “@+id/action_settings”, and the Title attribute set to “Setting”. Set the android:showAsAction to never.
The resulting XML will look like the following code. Please note that your drawable entry is properly different.
<menu xmlns:android="http://schemas.android.com/apk/res/android" >

    <item
        android:id="@+id/action_refresh"
        android:orderInCategory="100"
        android:showAsAction="always"
        android:icon="@drawable/ic_action_search"
        android:title="Refresh"/>
    <item
        android:id="@+id/action_settings"
        android:title="Settings"
        android:showAsAction="never"
        >
    </item>

</menu>
Change your RssfeedActivity class to the following code to use this XML file.
package com.example.android.rssfeed;

import android.app.Activity;
import android.content.Intent;
import android.os.Bundle;
import android.view.Menu;
import android.view.MenuItem;

public class RssfeedActivity extends Activity implements
    MyListFragment.OnItemSelectedListener {
  // Unchanged
  @Override
  public void onCreate(Bundle savedInstanceState) {
    super.onCreate(savedInstanceState);
    setContentView(R.layout.activity_rssfeed);
  }

  //NEW
  @Override
  public boolean onCreateOptionsMenu(Menu menu) {
    MenuInflater inflater = getMenuInflater();
    inflater.inflate(R.menu.mainmenu, menu);
    return true;
  }

  //NEW
  @Override
  public boolean onOptionsItemSelected(MenuItem item) {
    switch (item.getItemId()) {
    case R.id.action_refresh:
      Toast.makeText(this, "Action refresh selected", Toast.LENGTH_SHORT)
          .show();
      break;
    case R.id.action_settings:
      Toast.makeText(this, "Action Settings selected", Toast.LENGTH_SHORT)
          .show();
      break;

    default:
      break;
    }

    return true;
  }

  // Other methods which this class implements
}
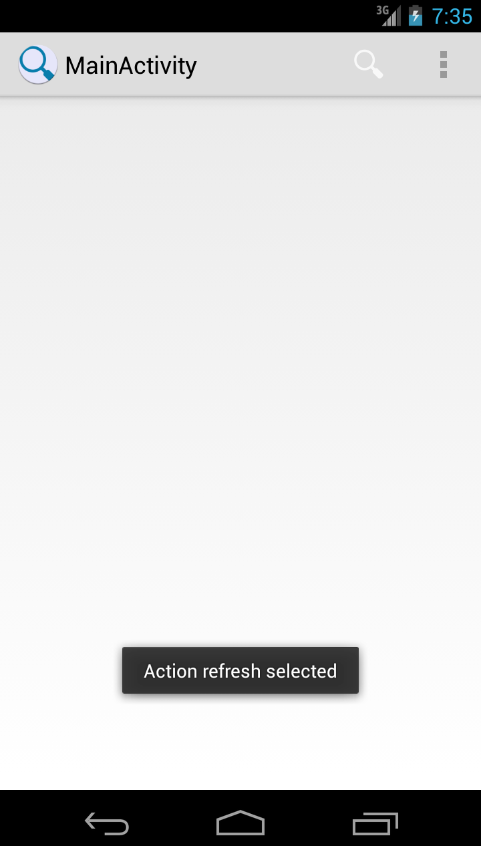
Run your application. As there is enough space in the ActionBar otherwise you may see the Overflow menu or you have to use the Option menu button on your phone. If you select one item, you should see a small info message.
Create a project called de.vogella.android.socialapp with the activity called OverviewActivity.
Add a EditText element your main.xml layout file.
<?xml version="1.0" encoding="utf-8"?>
<LinearLayout xmlns:android="http://schemas.android.com/apk/res/android"
    android:layout_width="match_parent"
    android:layout_height="match_parent"
    android:orientation="vertical" >

    <EditText
        android:id="@+id/myView"
        android:layout_width="match_parent"
        android:layout_height="wrap_content"
        android:ems="10" >

        <requestFocus />
    </EditText>

</LinearLayout>
Create a new menu XML resource with the contextual.xml file name.
<?xml version="1.0" encoding="utf-8"?>
<menu xmlns:android="http://schemas.android.com/apk/res/android" >
    <item
        android:id="@+id/toast"
        android:title="Toast">
    </item>

</menu>
Change your activity to the following.
package de.vogella.android.socialapp;

import android.app.Activity;
import android.os.Bundle;
import android.view.ActionMode;
import android.view.Menu;
import android.view.MenuInflater;
import android.view.MenuItem;
import android.widget.Toast;

public class OverviewActivity extends Activity {
  protected Object mActionMode;
  @Override
  public void onCreate(Bundle savedInstanceState) {
    super.onCreate(savedInstanceState);
    setContentView(R.layout.main);
    // Define the contextual action mode
    View view = findViewById(R.id.myView);
    view.setOnLongClickListener(new View.OnLongClickListener() {
      // Called when the user long-clicks on someView
      public boolean onLongClick(View view) {
        if (mActionMode != null) {
          return false;
        }

        // Start the CAB using the ActionMode.Callback defined above
        mActionMode = OverviewActivity.this
            .startActionMode(mActionModeCallback);
        view.setSelected(true);
        return true;
      }
    });
  }

  @Override
  public boolean onCreateOptionsMenu(Menu menu) {
    MenuInflater inflater = getMenuInflater();
    inflater.inflate(R.menu.mainmenu, menu);
    return true;
  }

  @Override
  public boolean onOptionsItemSelected(MenuItem item) {
    Toast.makeText(this, "Just a test", Toast.LENGTH_SHORT).show();
    return true;
  }

  private ActionMode.Callback mActionModeCallback = new ActionMode.Callback() {

    // Called when the action mode is created; startActionMode() was called
    public boolean onCreateActionMode(ActionMode mode, Menu menu) {
      // Inflate a menu resource providing context menu items
      MenuInflater inflater = mode.getMenuInflater();
      // Assumes that you have "contexual.xml" menu resources
      inflater.inflate(R.menu.contextual, menu);
      return true;
    }

    // Called each time the action mode is shown. Always called after
    // onCreateActionMode, but
    // may be called multiple times if the mode is invalidated.
    public boolean onPrepareActionMode(ActionMode mode, Menu menu) {
      return false; // Return false if nothing is done
    }

    // Called when the user selects a contextual menu item
    public boolean onActionItemClicked(ActionMode mode, MenuItem item) {
      switch (item.getItemId()) {
      case R.id.toast:
        Toast.makeText(OverviewActivity.this, "Selected menu",
            Toast.LENGTH_LONG).show();
        mode.finish(); // Action picked, so close the CAB
        return true;
      default:
        return false;
      }
    }

    // Called when the user exits the action mode
    public void onDestroyActionMode(ActionMode mode) {
      mActionMode = null;
    }
  };

}
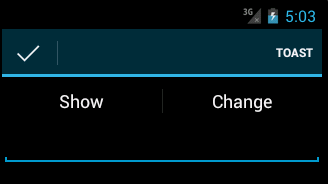
If you run this example and long press the EditText widget, your contextual ActionBar is displayed.
Before posting questions, please see the vogella FAQ. If you have questions or find an error in this article please use thewww.vogella.com Google Group. I have created a short list how to create good questions which might also help you.
vogella Training Android and Eclipse Training from the vogella team
Android Tutorial Introduction to Android Programming
GWT Tutorial Program in Java and compile to JavaScript and HTML
Eclipse RCP Tutorial Create native applications in Java
JUnit Tutorial Test your application
Git Tutorial Put everything you have under distributed version control system
Good example on how to integrate ABS. As a complement to this post, ActionBar Style Generator could be used to create different styles for the ActionBar (also ActionBarSherlock) http://jgilfelt.github.io/android-actionbarstylegenerator/
Thankyou for your feedback! 🙂
Hi,what is “R.id.container” at point number 7.1 ?
You can find the updated version of this tutorial at this page: http://www.vogella.com/articles/AndroidActionBar/article.html
Here you can ask to the author of the tutorial what you need.